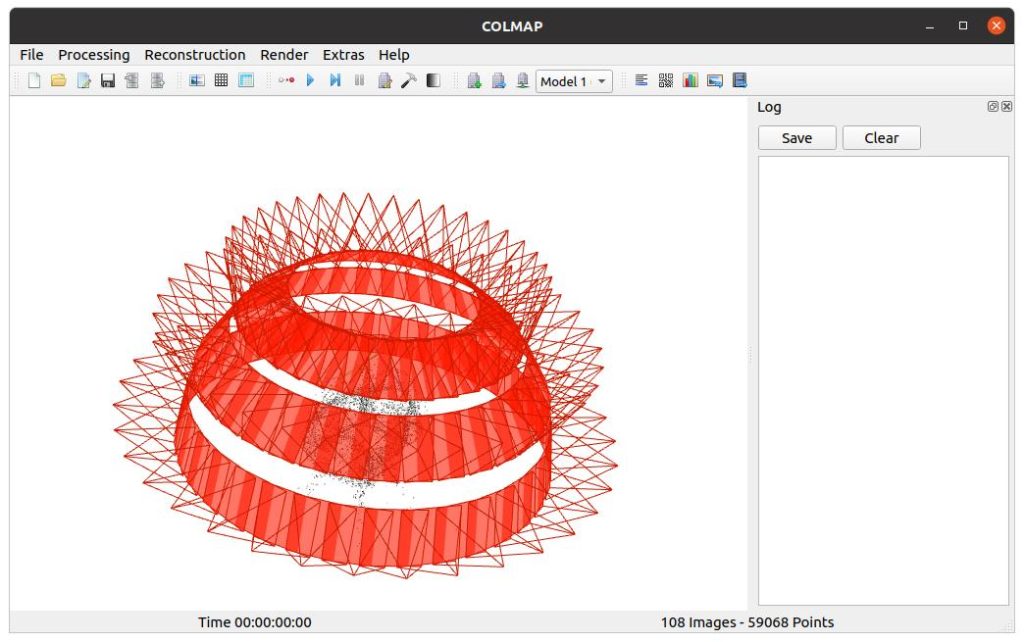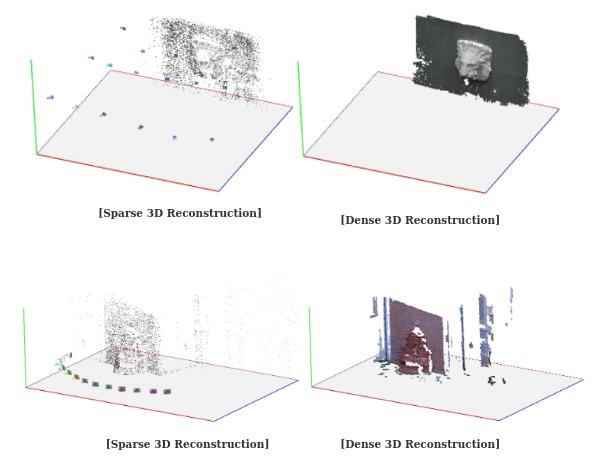
ColMap generates high-quality sparse point clouds, dense point clouds, and textured meshes during its Structure-from-Motion and Multi-View Stereo pipeline. Exporting these models correctly to external 3D software such as Blender or MeshLab is essential for further editing, texturing, rendering, measurement, or integration into larger projects. Proper export ensures that camera poses, point coordinates, colors, and mesh geometry are transferred accurately without loss of scale or alignment.
ColMap supports multiple output formats including PLY, OBJ, TXT, and binary files, making it compatible with most popular 3D tools. The export process involves saving the sparse reconstruction, the dense point cloud, or the final textured mesh. Users can perform exports through the graphical user interface or via command-line tools for automation. Understanding the available export options and best practices helps maintain data integrity when moving models between ColMap and software like Blender, MeshLab, CloudCompare, or other photogrammetry and rendering applications.
Overview of Model Export in ColMap
ColMap stores reconstruction data in an internal project database during processing. Once the sparse or dense reconstruction is complete, users can export the results in standardized formats that external applications can read. The export step is straightforward but requires attention to coordinate systems, units, and file formats to ensure seamless compatibility.
Common export targets include sparse point clouds with camera information, dense point clouds with color, and surface meshes with textures. Each type serves different purposes: sparse models are useful for camera tracking and alignment, while dense models and meshes are preferred for visualization, 3D printing, or detailed editing. ColMap provides both point-and-click options in the GUI and precise command-line utilities that allow batch processing and scripting.
What Is ColMap
ColMap is a powerful open-source software for image-based 3D reconstruction. It performs Structure-from-Motion to recover camera poses and sparse points, followed by Multi-View Stereo to create dense geometry. The tool is widely used in photogrammetry, cultural heritage, robotics, visual effects, and research due to its accuracy and flexibility.
ColMap runs on Windows, Linux, and macOS and offers both a graphical user interface for interactive work and command-line tools for automation. After reconstruction, exporting the results is a critical final step before using the models in downstream applications. The software supports several export formats and includes utilities to convert between them, ensuring broad compatibility with industry-standard 3D tools.
Preparing the Reconstruction for Export
Before exporting, ensure the reconstruction is complete and of acceptable quality. In the ColMap graphical interface, open the project and verify that most images are successfully registered in the sparse model. Check the dense reconstruction for completeness and remove obvious outliers if necessary.
For best results, run bundle adjustment as the final step in the sparse stage to minimize reprojection errors. In the dense stage, apply fusion with appropriate consistency settings to produce a clean point cloud. If a surface mesh is required, generate it using the Poisson reconstruction option or import the dense point cloud into external software for advanced meshing.
It is advisable to undistort images and save the undistorted versions if texturing will be performed outside ColMap. Saving intermediate results at each major stage allows easy recovery if export issues arise later.
Exporting the Sparse Reconstruction
The sparse reconstruction contains camera poses, intrinsics, and a sparse point cloud. This data is valuable for camera tracking, alignment with other models, or as a lightweight reference.
In the graphical user interface, navigate to the Reconstruction menu and select the option to export the current model. ColMap offers several choices for sparse export. The most common format is PLY, which includes 3D points with color information. Another useful format is the text-based .txt export that writes camera parameters and points in a human-readable form.
For compatibility with Blender and other tools that support camera data, export the model as a set of files including cameras.txt, images.txt, and points3D.txt. These files follow the standard ColMap text format and can be imported using scripts or add-ons in Blender.
Command-line export is performed using the colmap model_converter tool. This utility converts between different ColMap model formats and also exports to PLY or OBJ. For example, converting a binary model to text format makes it easier to inspect or process with custom scripts.
Exporting the Dense Point Cloud
The dense point cloud produced by Multi-View Stereo contains millions of points with color and sometimes normal information. This is the most frequently exported output for visualization and editing.
After completing the dense reconstruction, go to the Dense menu in the GUI and choose Export Point Cloud. The default and most reliable format is PLY, which preserves point positions, colors, and normals. ColMap also supports ASCII text export for dense clouds, though PLY is preferred due to its smaller file size and faster loading in most software.
When exporting, users can choose to include or exclude normal vectors. Including normals is useful for subsequent surface reconstruction or shading in Blender and MeshLab. For very large dense clouds, consider exporting at a reduced density or in chunks to manage file size and memory usage in target applications.
Using the command line, the colmap model_converter or dedicated dense export commands allow automated export of the fused point cloud directly from the workspace folder.
Generating and Exporting Textured Meshes in ColMap
ColMap can generate a surface mesh from the dense point cloud using Poisson surface reconstruction. After fusion, select the Poisson Meshing option in the dense reconstruction menu. Adjust parameters such as depth and point weight to control mesh detail and smoothness.
Once the mesh is created, export it as an OBJ file with associated MTL material and texture images. ColMap automatically bakes the texture from the original input images onto the mesh during export. The resulting OBJ file contains geometry, while the accompanying texture images provide color information.
This workflow produces a ready-to-use textured mesh that can be directly imported into Blender or MeshLab. If the automatic texturing result shows seams or lighting inconsistencies, users can re-texture the mesh in Blender using more advanced UV unwrapping and blending techniques.
Importing ColMap Models into Blender
Blender is one of the most popular destinations for ColMap exports. Several methods exist for importing ColMap data into Blender.
For sparse reconstructions, the recommended approach is to use the official ColMap add-on or community scripts that read the cameras.txt, images.txt, and points3D.txt files. These scripts create camera objects with correct intrinsics and extrinsics and add the sparse point cloud as a point object.
For dense point clouds in PLY format, Blender’s built-in PLY importer works directly. Import the PLY file through File → Import → Stanford (.ply). The point cloud appears with vertex colors preserved.
For textured meshes exported as OBJ, use File → Import → Wavefront (.obj). Blender will load the geometry and automatically link the texture images if the MTL file is present in the same folder. After import, users can apply materials, adjust shading, perform retopology, or add lighting and animations as needed.
Several free add-ons enhance the workflow, such as the Blender ColMap importer that automates camera setup and point cloud loading. Always check scale after import, as ColMap reconstructions are often up to an arbitrary scale unless metric information was provided during reconstruction.
Importing ColMap Models into MeshLab
MeshLab is a lightweight and powerful tool for processing and editing large point clouds and meshes. It handles ColMap exports exceptionally well.
Import dense point clouds by opening the PLY file directly in MeshLab. The software displays points with colors and normals. MeshLab provides numerous filters for cleaning, downsampling, computing normals, and generating surfaces from the point cloud.
For meshes exported from ColMap as OBJ, MeshLab opens the file and loads the associated texture if present. Users can then apply smoothing, remeshing, or texture editing filters. MeshLab is particularly useful for repairing holes in meshes, reducing polygon count, or converting between formats before transferring to other applications.
The software also supports batch processing scripts, making it suitable for automating cleanup of multiple ColMap exports.
Exporting to Other Common 3D Software
Beyond Blender and MeshLab, ColMap models can be exported to many other tools. CloudCompare excels at handling large point clouds and offers advanced alignment and measurement tools. Import PLY files directly and use its rich set of processing algorithms.
For professional CAD and BIM workflows, export the dense point cloud or mesh to formats compatible with AutoCAD, Revit, or Rhino. Intermediate conversion through MeshLab or CloudCompare often helps when direct support is limited.
In visual effects pipelines, sparse camera data from ColMap is frequently imported into Maya, 3ds Max, or Nuke using custom Python scripts that parse the ColMap text format. Dense geometry can be brought in as Alembic or OBJ caches.
For game development and real-time applications, export the textured mesh as OBJ or FBX and import into Unity or Unreal Engine. Additional optimization steps such as LOD generation and texture compression are usually performed after import.
Advanced Export Techniques and Automation
For large projects or repetitive workflows, command-line export is highly recommended. The colmap model_converter tool supports conversion between binary, text, and PLY formats with various options for filtering points or cameras.
Scripts written in Python using PyCOLMAP can read the reconstruction database directly and export custom data structures tailored to specific target software. This approach provides maximum flexibility and enables integration into automated pipelines.
When dealing with very large models, consider exporting in chunks or at multiple levels of detail. ColMap allows setting maximum point limits or resolution during dense export to manage file sizes.
Coordinate system alignment is another advanced consideration. If the reconstruction needs to be aligned with real-world coordinates or other scans, apply a similarity transformation (scale, rotation, translation) either in ColMap or after import in the target software.
Best Practices for Reliable Export and Import
Always verify the exported model in a simple viewer before importing into complex software. Check that point colors appear correctly and that the mesh texture aligns properly with the geometry.
Maintain consistent units and scale throughout the workflow. If metric scale is important, record scale information during reconstruction and apply the same scaling factor after import.
Organize export folders clearly with separate directories for sparse, dense, and mesh outputs. Include a readme file noting the ColMap version, reconstruction settings, and any manual transformations applied.
When transferring between multiple tools, prefer lossless formats such as PLY for point clouds and OBJ with textures for meshes. Avoid repeated format conversions that may introduce precision loss.
Test the full pipeline with a small subset of images first to identify potential issues with export settings or import compatibility.
Common Issues and Troubleshooting
Users sometimes encounter missing textures when importing OBJ files. This usually occurs if the texture image files are not in the same folder as the OBJ or if the MTL file paths are incorrect. Ensure all associated files remain together during transfer.
Large PLY files may cause memory errors in some software. Downsample the point cloud in MeshLab or CloudCompare before importing into Blender for smoother performance.
Scale mismatches are common because ColMap reconstructions are often arbitrary scale. Use known distances from the scene or apply a scaling factor based on GPS or measured references to correct this.
Camera import failures in Blender typically result from mismatched coordinate conventions. Most community scripts include options to flip axes or adjust handedness to match Blender’s coordinate system.
If exported models appear distorted, double-check that bundle adjustment was completed successfully and that the correct camera model was used during reconstruction.
Integrating Exported Models into Professional Workflows
In cultural heritage projects, exported ColMap meshes are often imported into Blender for virtual restoration and then rendered with high-quality lighting. For archaeological documentation, dense point clouds go to CloudCompare for measurement and annotation before final archiving.
Visual effects artists import ColMap camera tracks into compositing software and align dense geometry with CG elements. Game developers optimize ColMap meshes in Blender, bake additional maps, and export to game engines.
Researchers frequently export sparse and dense data for use in machine learning pipelines or as ground truth for new reconstruction algorithms.
Future Compatibility and Updates
ColMap developers regularly improve export capabilities and maintain compatibility with evolving standards in 3D software. Newer versions may add direct support for additional formats or enhanced texture baking options.
Staying updated with both ColMap and target software releases ensures the smoothest workflow. Community forums and documentation provide the latest guidance on export best practices as new features are introduced.
Conclusion
ColMap offers flexible and reliable options for exporting sparse reconstructions, dense point clouds, and textured meshes to other 3D software. By using the appropriate formats such as PLY for point clouds and OBJ with textures for meshes, and by following best practices for preparation and import, users can seamlessly transfer high-quality models into Blender, MeshLab, CloudCompare, and many other applications.